
Markup AI Lint for VS Code — Integration Guide
Markup AI Lint for VS Code — Integration Guide
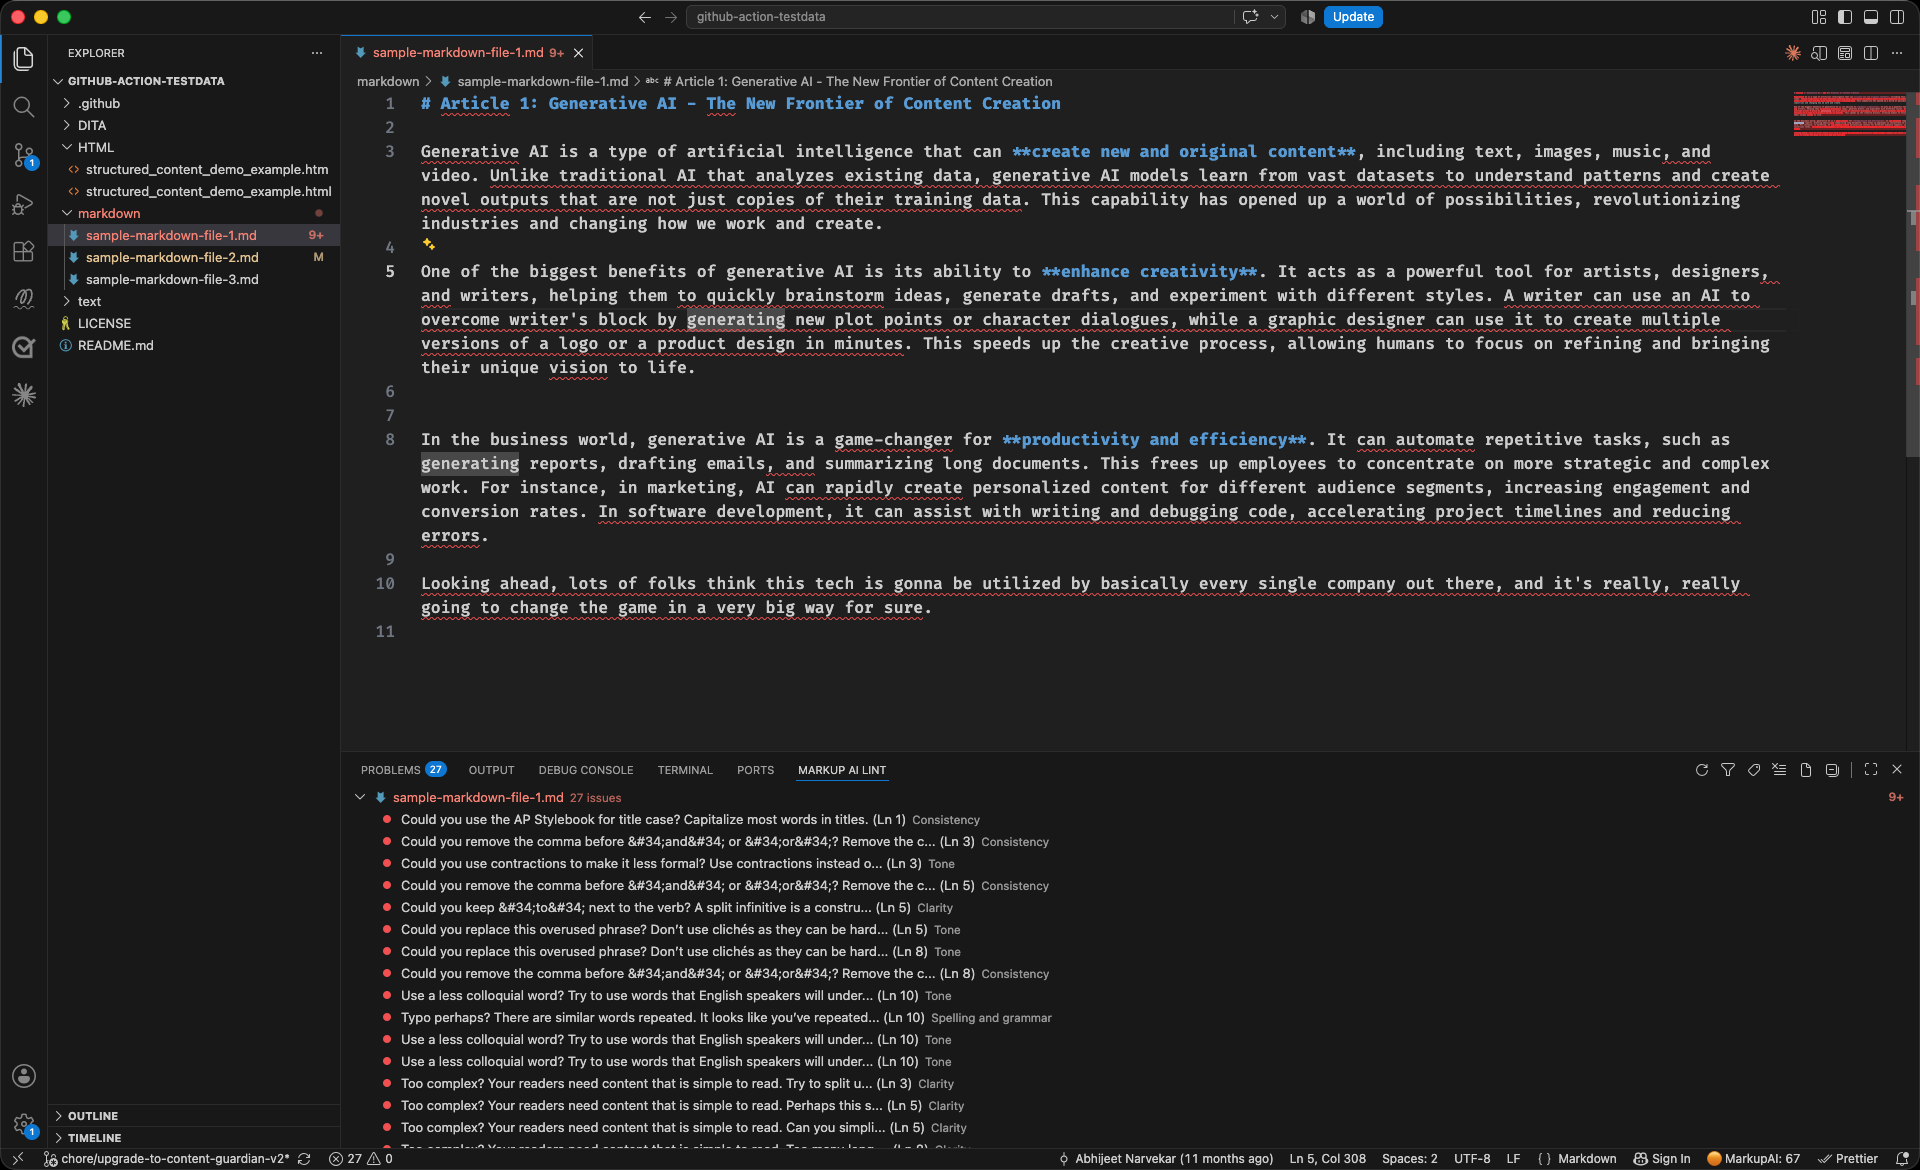
Use Markup AI Lint to check your content the way you check your code. The extension runs as a native linter inside Visual Studio Code — issues are underlined right in the editor, hover any one of them for the explanation, and apply the suggested fix with a click or the quick-fix lightbulb.
There’s no panel to open and no Check button to press. Open a supported file and it’s checked; the status bar keeps a running summary of the current document. When you want more than one file at a time, the Folder Scanner checks a whole folder and collects every finding in one place.
Markup AI ships two extensions for VS Code, and you can install either or both. Prefer Markup AI Lint when you want checks to feel like linting — inline, automatic, keyboard-driven. Prefer the Markup AI sidebar when you want a review panel with issue cards, scores per agent, and grouped triage.
What you need
- Visual Studio Code Desktop. Content checking doesn’t work in VS Code for the Web (vscode.dev, github.dev), where browser CORS rules block the API.
- A Markup AI account — create one at console.markup.ai.
- Permission to install VS Code extensions. If your editor is managed by your organization, an admin may need to allow it first.
Which agents are supported
- Style Agent
What Markup AI Lint does for you in VS Code
- Check as you open: Supported files are checked automatically when you open them — no command to run.
- Inline diagnostics: Every issue is underlined in the editor and listed in the Problems panel, with high / medium / low risk mapped to VS Code’s error / warning / info levels.
- Hover for the explanation: Hover any flagged phrase to see the category, the guideline behind it, the risk level, and the suggested replacement.
- One-click fixes: Click Apply Fix in the hover, or use the quick-fix lightbulb (⌘. / Ctrl+.) to rewrite the text in place.
- Status bar summary: A running risk summary — or a quality score, for organizations that have numeric scoring enabled — for the document you’re in.
- Findings panel: A tree of every issue found, filterable by severity and category, scoped to the current file or across all checked files.
- Folder Scanner: Check every supported file in a folder, or just the ones you pick, and review the results together.
Installing the extension
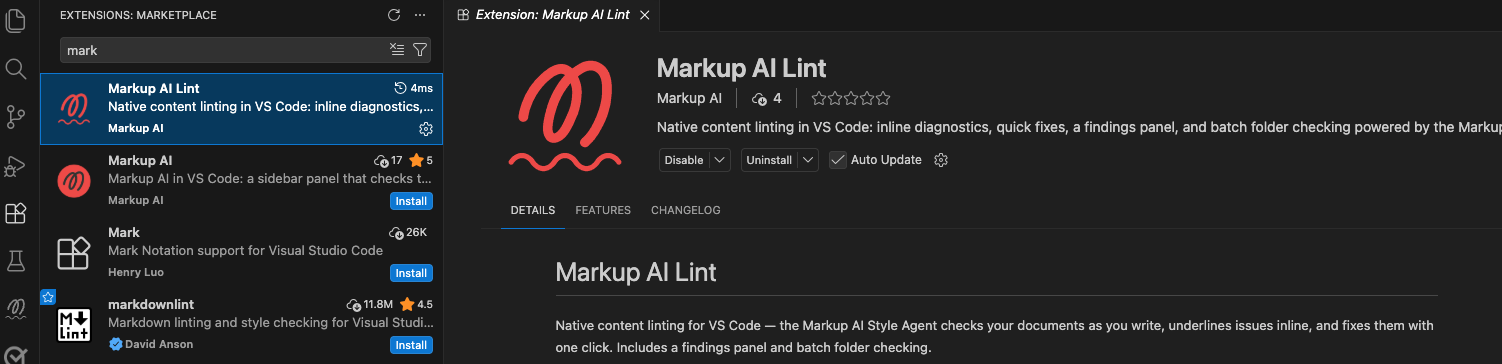
The extension is published to the Visual Studio Marketplace as Markup AI Lint (publisher: markupai).
Open the Extensions view
In VS Code, select the Extensions icon in the activity bar (or press ⇧⌘X / Ctrl+Shift+X).
Signing in
- Click Markup AI: Sign in in the status bar — or run Markup AI Lint: Sign In from the Command Palette (⇧⌘P / Ctrl+Shift+P).
- Choose Sign in with browser. Your default browser opens to the Markup AI sign-in page — sign in with your Google or Microsoft account, or your credentials, then return to VS Code. The extension picks up the completed sign-in automatically and checks the active document.
- Your session is remembered — tokens are stored in VS Code’s Secret Storage and refreshed in the background, so you normally won’t sign in again on the same machine unless you sign out. To end the session, run Markup AI Lint: Sign Out.
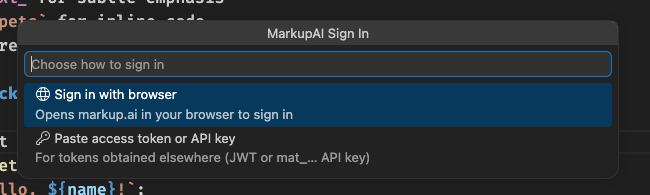
Paste access token or API key is the fallback path — use it when you already hold a token (a JWT or a mat_… API key) from somewhere else, such as a CI environment. For everyday use, sign in with the browser.
Checking a document
Open any supported file — Markdown, plain text, HTML, or DITA/XML — and Markup AI Lint checks it for you. When the check finishes:
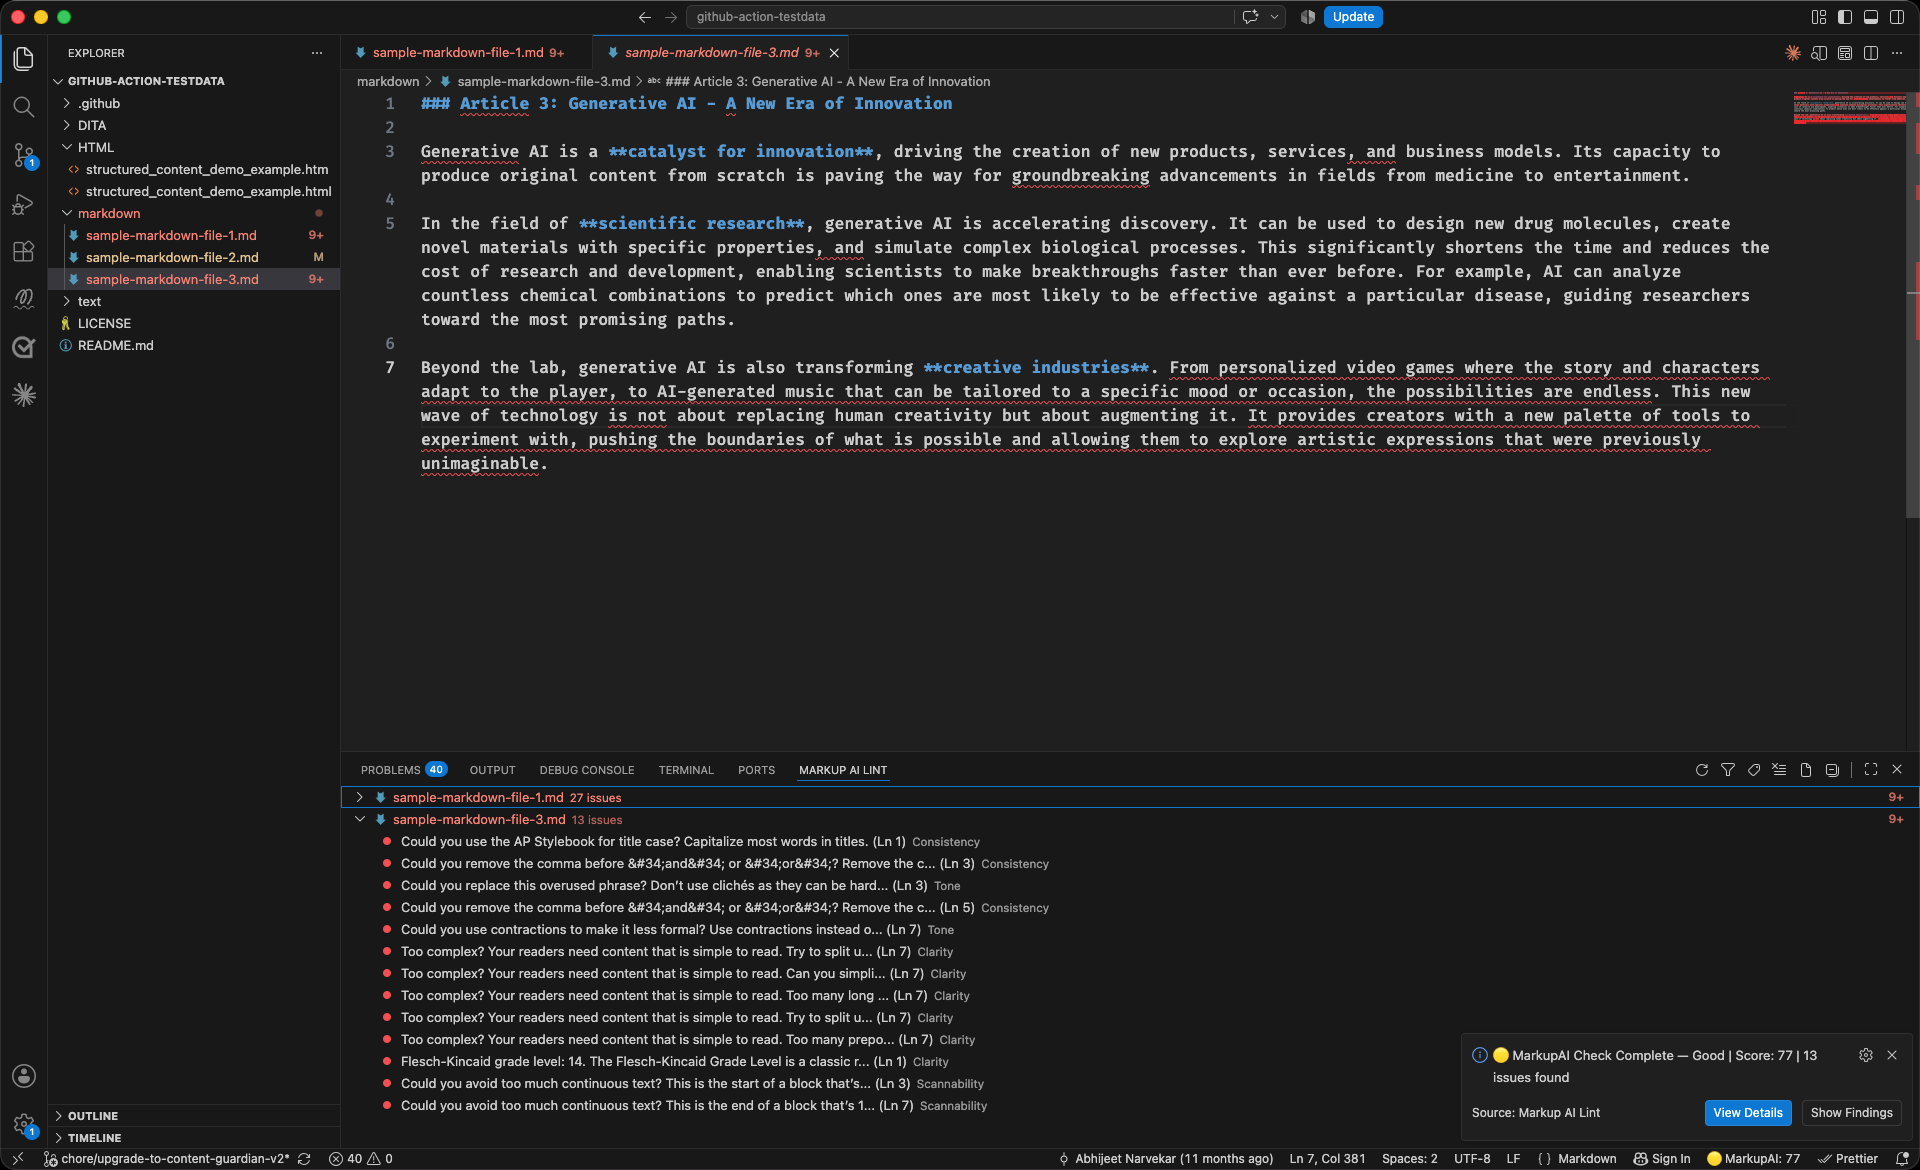
- Every issue is underlined in the editor, colored by risk level, and mirrored into the Problems panel.
- The status bar shows the result for the active document.
- A notification summarizes the check, with View Details and Show Findings actions.
Re-check the current document at any time with Markup AI Lint: MarkupAI - Check Content from the Command Palette or the editor right-click menu.
Reading the status bar
The status bar entry always reflects the active editor, and clicking it opens the content assessment for that document.

What you’ll see there depends on your organization’s settings and the state of the check:
Click the entry (or run Markup AI Lint: Show Content Scores) to open the MarkupAI Content Assessment — the quality score, the count of high, medium, and low risk issues, and the style guide the check ran against. You can switch the style guide from there.
Reviewing and resolving issues
Hover an issue
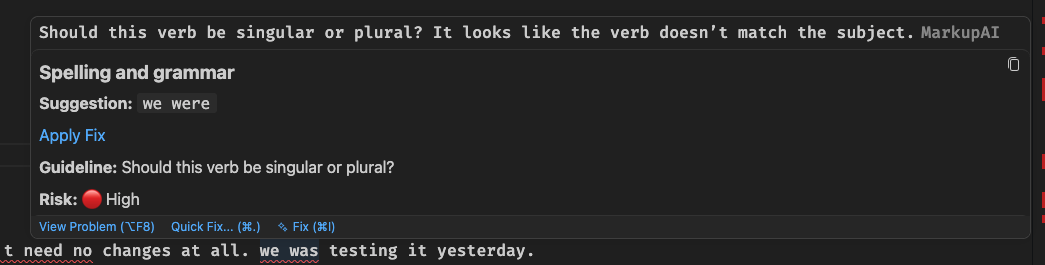
Hover any underlined phrase to see what Markup AI flagged and why:
- The explanation of the issue, in plain language.
- The category (Clarity, Spelling and grammar, Tone, and so on).
- The guideline behind the finding.
- The risk level — 🔴 High, 🟡 Medium, or 🔵 Low.

Apply the fix
When Markup AI has a suggested replacement, the hover shows it under Suggestion with an Apply Fix link. Click it and the text is rewritten in place.
You have three other ways to act on the same finding:
- Quick fix — put the cursor in the flagged text and press ⌘. / Ctrl+. for the lightbulb menu. Fix: Replace ”…” with ”…” applies the suggestion.
- Hide a whole category — the same lightbulb menu offers Disable Category Issues, which hides every finding in that category. Bring them back with Markup AI Lint: MarkupAI - Enable Category.
- Edit manually — fix the text yourself and re-run the check to re-score.
Applied fixes are ordinary document edits, so ⌘Z / Ctrl+Z undoes them. Remaining issues keep their positions as the text around them shifts, so you can work down the list without re-checking after every fix.
The Findings panel
The Markup AI Lint panel (next to Problems and Terminal) lists findings grouped by file, each with its message, category, and line number. Click any finding to jump to the exact text in the editor.
The panel’s toolbar gives you:
- Filter by Severity — scope the list to High, Medium, or Low.
- Filter by Category — scope it to Clarity, Tone, Spelling and grammar, and so on.
- Clear Filters — drop both filters.
- Show Current File Only / Show All Files — toggle between the active document and every file you’ve checked this session.
- Refresh Findings — rebuild the list.
The panel title carries the total count, and any active filters, so you always know what you’re looking at.
Checking a whole folder
The Folder Scanner — the Markup AI Lint icon in the activity bar — lists every supported file in your workspace so you can check them in a batch.
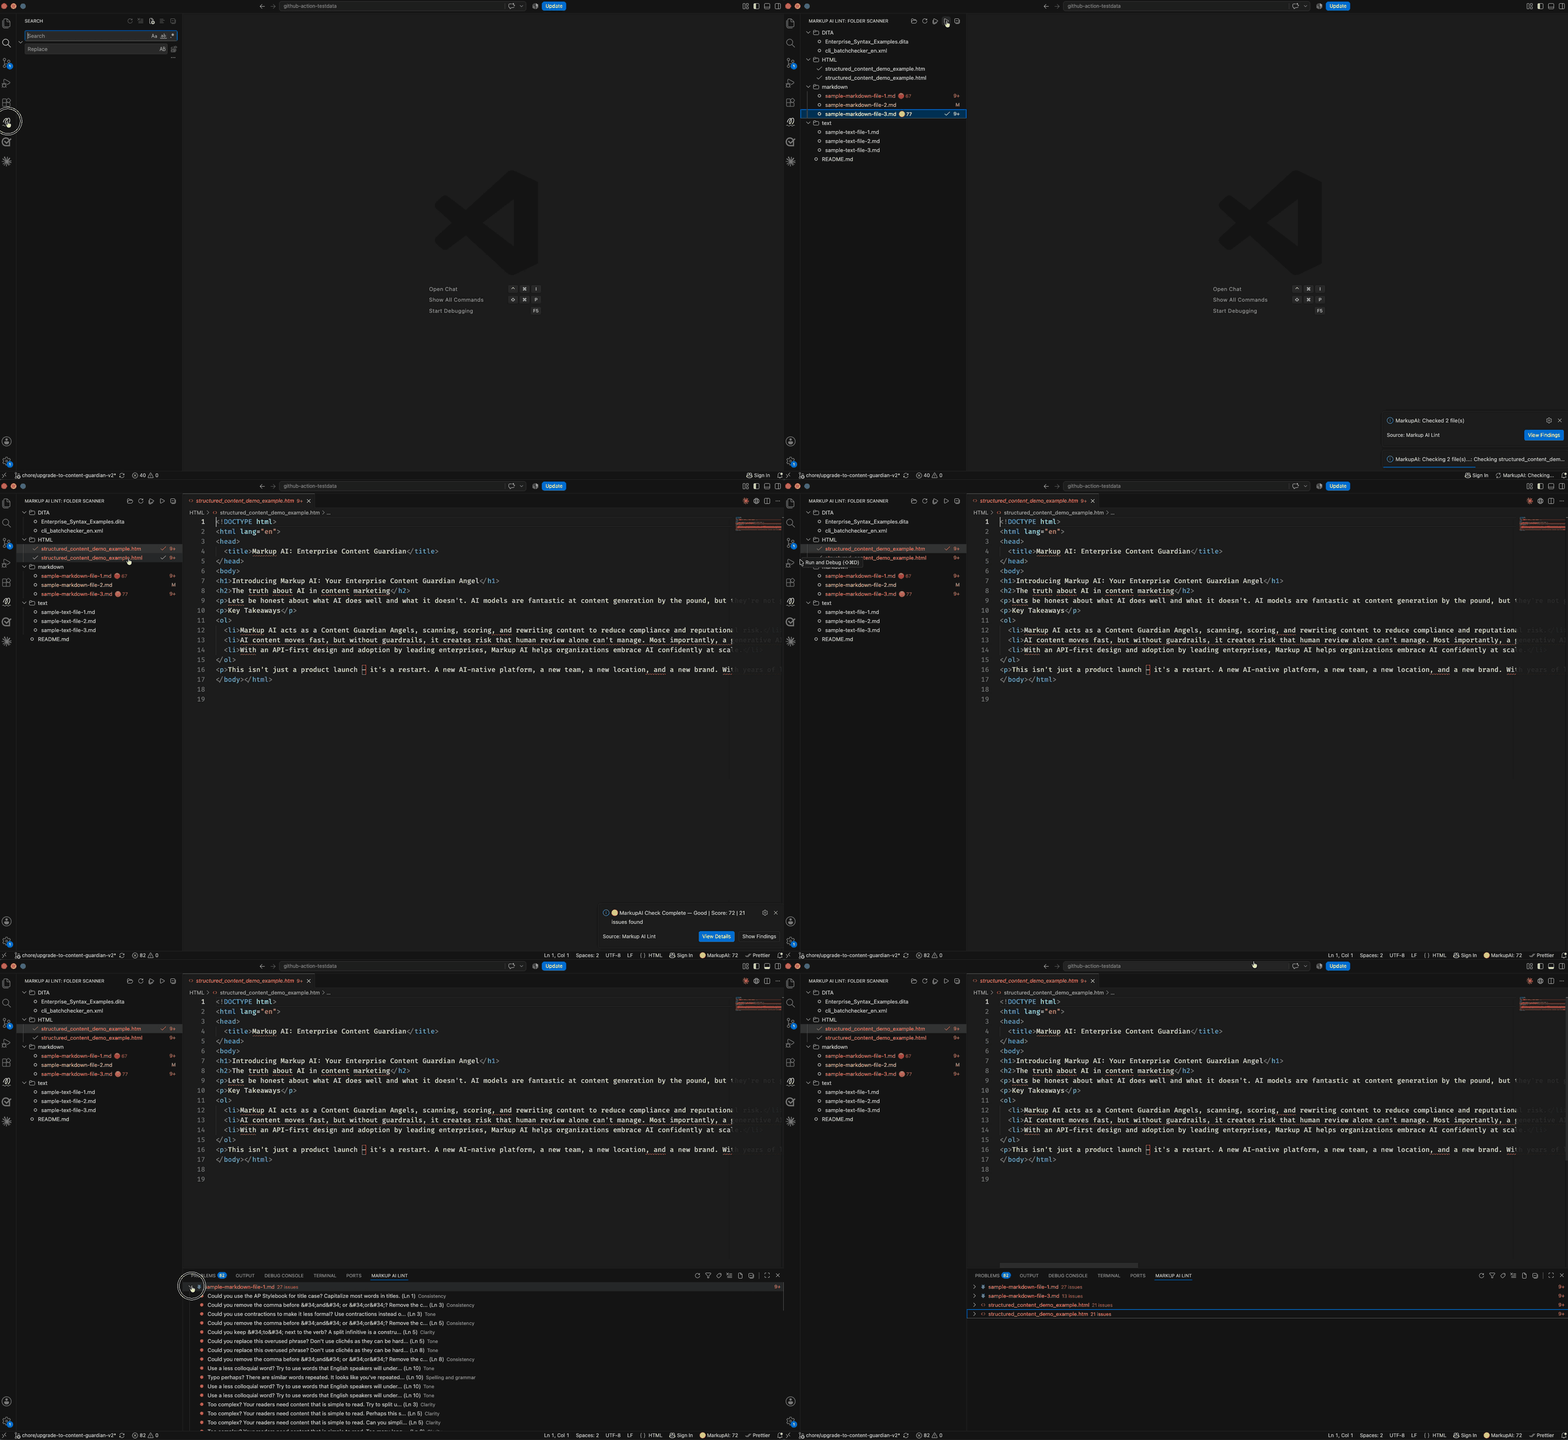
- Open the Markup AI Lint view from the activity bar. It loads your workspace folder automatically; use Change Folder in the view toolbar to point it somewhere else.
- Check the files:
- Check All Files runs against every supported file in the folder, recursively.
- Check Selected Files runs against just the files you’ve ticked. Click a file’s inline check icon to select or deselect it.
- Progress shows in a notification as each file is checked. When the batch finishes, click View Findings to open the results in the Findings panel.
Each file in the tree picks up its result beside the name — the quality score, or the risk summary — so you can see at a glance which documents need attention.
The scanner skips hidden folders (anything starting with .) along with node_modules, dist, and build. Files are checked one at a time against the API, so a large folder takes a while; the progress notification tells you where it’s up to.
Settings
All settings live under Markup AI Lint in the Settings editor (⌘, / Ctrl+,).
Choosing a style guide
Run Markup AI Lint: Select Style Guide from the Command Palette (or click Style Guide in the content assessment dialog) to pick from the style guides your organization has configured — the current selection is marked, and your organization’s default is labelled. The choice is saved to your user settings and applies to every document until you change it.
Your brand standards themselves — style guides, terminology, tone — are managed in the Markup AI console; the extension checks against whatever your organization has configured there.
FAQ
- Which files can I check? Markdown (
.md), plain text (.txt), HTML (.html,.htm), and DITA/XML (.dita,.xml). Markdown, HTML, and DITA/XML are checked with format awareness. Unsaved (untitled) files work too. - Do I have to run a command to check a file? No. Files are checked when you open them. Use MarkupAI - Check Content when you want to re-check after editing, or turn on checkOnChange to have it re-check as you type.
- Can I check just a selection? No — Markup AI Lint checks the whole document. To check a passage on its own, use the Markup AI sidebar extension, which supports selection checks.
- Will the extension change my document without asking? No. It only edits when you apply a fix — from the hover, the quick-fix lightbulb, or the Findings panel. ⌘Z / Ctrl+Z undoes any change.
- Where do the underlines come from? They’re standard VS Code diagnostics, so findings also appear in the Problems panel and follow your editor’s error/warning/info styling. High risk maps to error, medium to warning, low to info.
- Can I run both Markup AI extensions at once? Yes. They’re separate extensions with separate commands and settings, and they don’t conflict — Lint owns the inline diagnostics, and the sidebar owns the review panel.
- Does it work in VS Code for the Web? The extension loads, but content checking doesn’t work there: the browser blocks the API calls (CORS). Use VS Code Desktop.
- Do I need to update the extension? No. VS Code updates extensions automatically — you’ll always be on the latest version.
- Nothing is being checked — what should I look at? In order: the status bar (are you signed out, or is checking disabled?), the file type (is it one of the supported extensions?), and your organization’s settings (the extension warns if the Style Agent isn’t enabled for your org).
Known limitations
- VS Code Desktop only. VS Code for the Web (vscode.dev, github.dev) can’t reach the API from the browser.
- Whole documents only. There’s no selection check — the full document is submitted every time.
- Very large documents aren’t checked. The Style Agent rejects documents above roughly 100,000 characters. Split long files to check them.
- Findings are per session. Results live in memory, so they clear when you close a document or restart VS Code. Re-open the file and it’s checked again.
- Folder checks run file by file. Large folders take proportionally longer, and the batch can’t be cancelled once it’s running.
- Text content only. Images and other non-text elements aren’t analyzed.