
Markup AI for Figma — Integration Guide
Markup AI for Figma — Integration Guide
Use Markup AI inside Figma to check and score the text in your designs before they ship. The integration runs as a Figma plugin — open a design file, select the text you want to audit, click Check, and review issues from the Markup AI sidebar without leaving Figma.
What you need
- A Figma account with edit access to the design file.
- The Markup AI plugin installed from the Figma Community.
- A Markup AI account, signed in via Google, Microsoft, or email.
Which agents are supported
- Style Agent
What Markup AI does for you in Figma
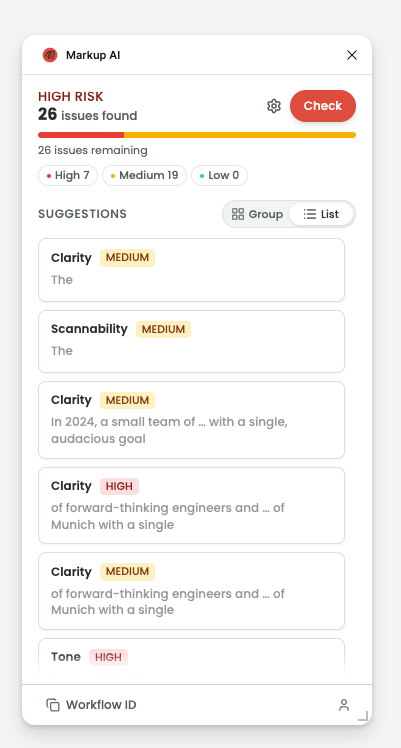
- Check & score: Analyze the selected text layers and get a Content Risk Score (High / Medium / Low Risk) plus a count of issues found.
- Grouped, filterable issues: Issues are returned as a categorized list. Filter by severity (High, Medium, Low) or scope to a single agent, and switch between Group and List views.
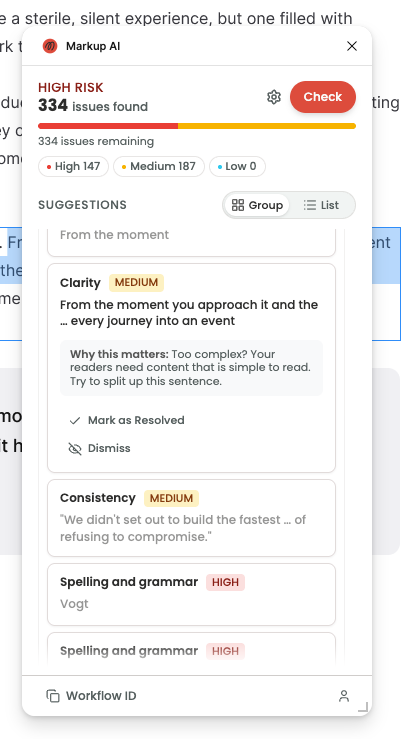
- In-canvas highlighting: Click an issue card to highlight the matching text on the Figma component, so you can locate it visually.
- Apply a suggestion: When Markup AI returns a suggested replacement, click the suggestion to rewrite the text directly on the layer — or use Apply to all occurrences to fix every match at once.
- Resolve or dismiss: Mark an issue resolved when you’ve handled it another way, or dismiss it when it doesn’t apply.
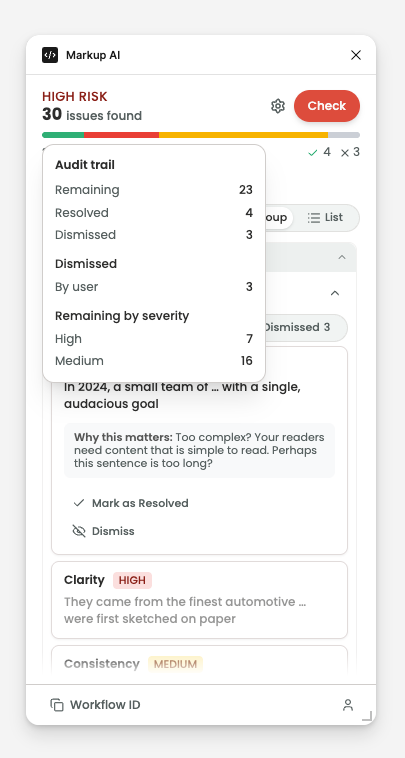
- Audit trail: Review per-severity totals plus how many suggestions you applied and dismissed for the run.
Installing the plugin
- In Figma, open the Plugins menu (Main menu → Plugins → Manage plugins, or the Actions menu in the toolbar).
- Search for Markup AI and open the listing.
- Click Save (or Run) to add it to your plugins.
Once saved, Markup AI appears in your Actions / Plugins menu for any design file.
Launching Markup AI in Figma
- Open a design file in Edit mode.
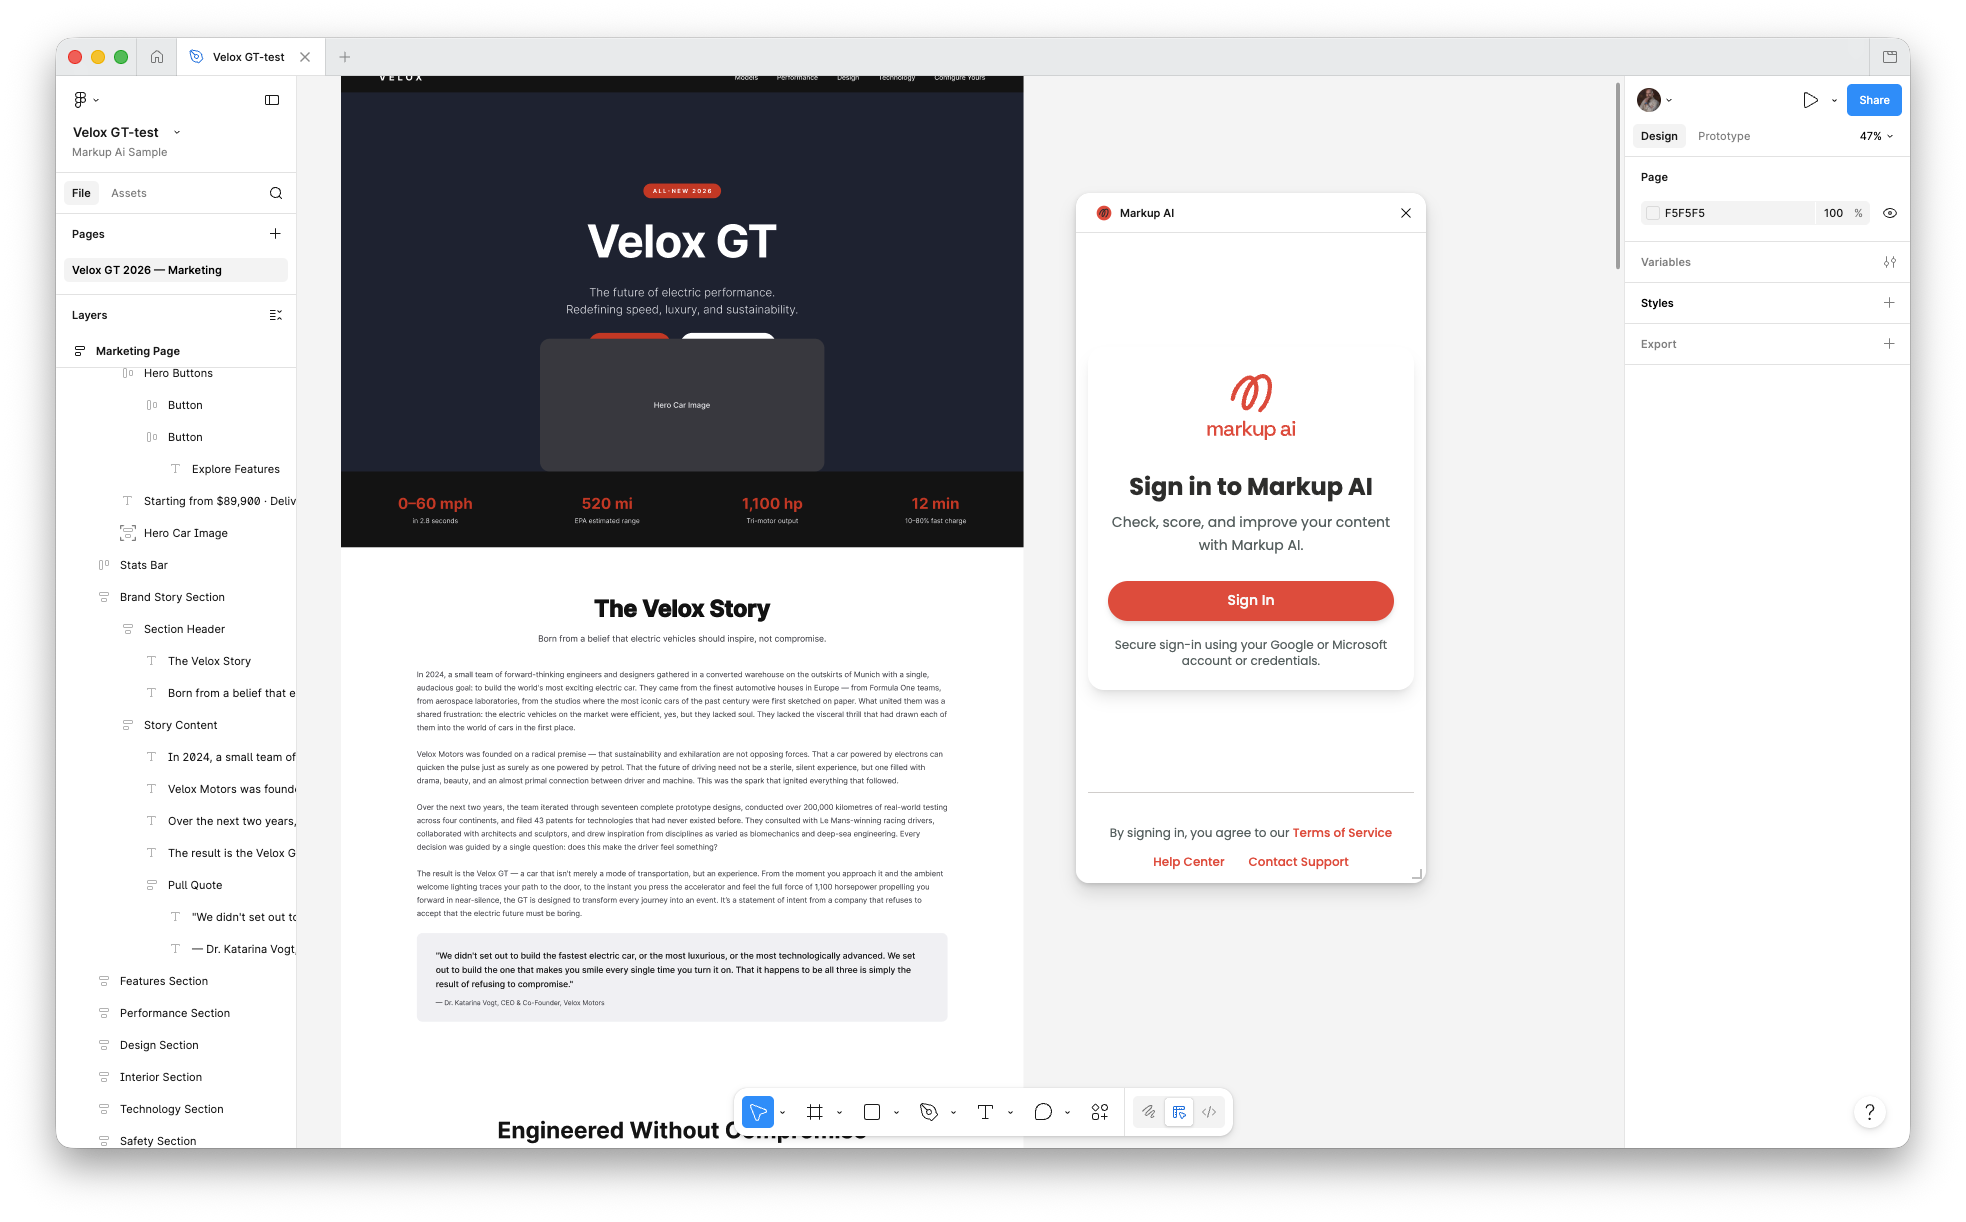
- From the Actions / Plugins menu, run Markup AI. The sidebar opens alongside your canvas.
- Sign in to Markup AI if prompted (Google, Microsoft, or email are supported). Your sign-in persists for future sessions.
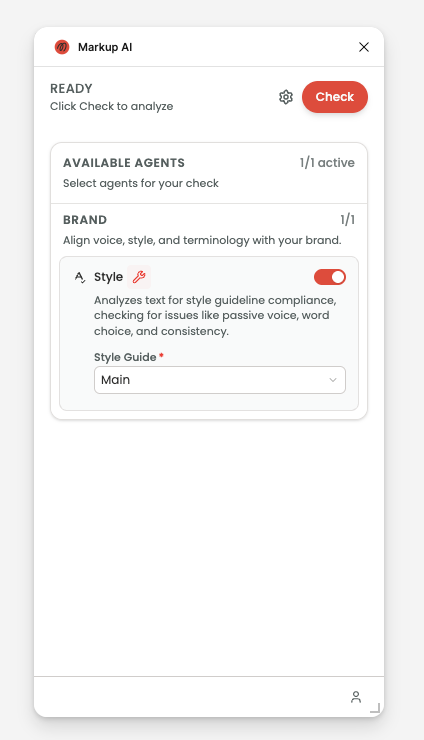
When you first open the sidebar after signing in, it shows the Ready state with the available agents listed — Markup AI is ready to check the text you select.
Configure your check
Right after signing in, the sidebar shows the available agents on the home view — no navigation required. Use the toggles and dropdown to pick the right configuration for your team:
- Style Agent (under Brand): Enabled by default. Checks text against the Style Guide you select. It’s the runnable agent today; the agents under Compliance, Content Integrity, and AI Visibility are previews.
- Style Guide: Pick the guide the check should evaluate against from the inline dropdown — Default (provided by Markup AI) or a custom guide configured for your organization.
- Settings (gear icon) at the top of the sidebar reopens this configuration between checks.
Settings persist for the session, so you only configure them once.
Running a check
- In your design file, select the text layer or component you want to audit. You must have a text layer selected before running a check.
- In the Markup AI sidebar, click Check. The plugin extracts the text from the selection, analyzes it, and posts the result back to the sidebar. While the scan runs, Check becomes a Cancel button you can use to stop it.
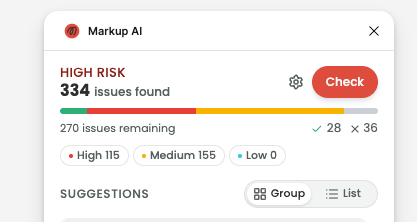
- The header updates with:
- A Content Risk score — High Risk, Medium Risk, or Low Risk (All Clear when nothing is flagged).
- The issue count for the selection.
- A severity breakdown as filter pills: High, Medium, Low.
- Re-run Check any time to refresh the score after editing the text.
Reviewing and resolving issues
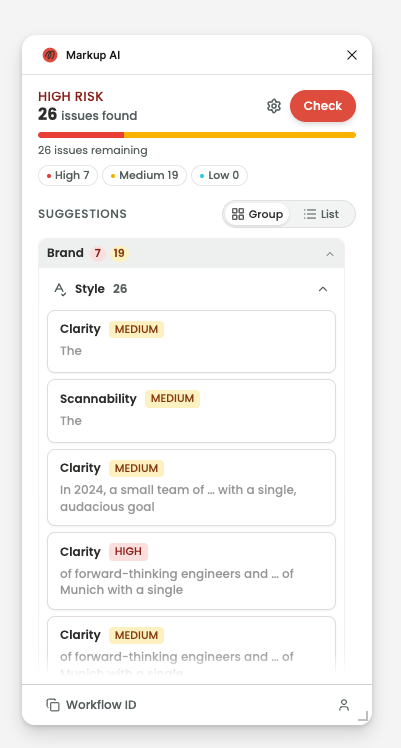
Once the check completes, Markup AI lists every issue under the Suggestions section. Use the controls at the top of the list to triage:
- Severity pills — Click High, Medium, or Low to scope the list to one severity level.
- Agent filter — When more than one agent ran, scope the list to a single agent.
- Group / List — Toggle between Group view (issues grouped by agent and category, e.g. Brand → Style) and List view (a flat, severity-ordered list).
- Open / Resolved / Dismissed tabs — Once you start applying or dismissing, status tabs appear so you can review or undo earlier decisions.
Working through an issue card
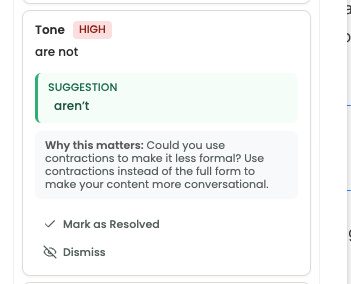
- Click anywhere on an issue card to expand it. Only one card is open at a time. The card reveals:
- The category label and severity tag (HIGH / MEDIUM / LOW).
- The issue text — the exact phrase Markup AI flagged.
- The suggested replacement (when Markup AI has one) shown as a click-to-apply chip.
- A Why this matters explanation of the rule.
- Click the issue text to highlight the matching content on the Figma component — useful for locating the issue on a busy canvas.
- Decide what to do:
- Apply the suggestion — click the suggestion text to rewrite the layer directly. There’s no separate Apply button; the suggestion itself is the click target. To fix repeats, tick Apply to all N occurrences before clicking. The card moves to the Resolved tab.
- Mark as Resolved — use the footer button when you’ve handled the issue another way (edited the text manually, or decided the wording is fine). The layer is left unchanged and the card moves to Resolved.
- Dismiss — click the × to remove an issue that doesn’t apply. The card moves to Dismissed.
Not every issue comes with a suggestion. Awareness-only flags show just the issue text and the Why this matters explanation; your options there are Mark as Resolved or Dismiss.
Tracking your progress
As you apply suggestions and dismiss issues, the sidebar header tracks your progress:
- The severity progress bar updates dynamically — the resolved share grows and the High / Medium / Low segments shrink.
- The issues remaining count reflects only the Open tab; applied and dismissed items move behind the Resolved and Dismissed tabs.
- Click the bar to open the audit trail popover: per-severity totals plus Applied and Dismissed counts for the run.
- When every issue is applied or dismissed, the headline switches to All Clear. Select a different layer and run Check again to keep going.
Sharing a check with Markup AI support
Every check produces a unique workflow ID. If you want Markup AI’s support team to review a specific run (for example, to investigate an unexpected suggestion):
- Click Workflow ID in the bottom-left of the sidebar footer to copy the ID to your clipboard.
- Share the ID with Markup AI support along with a short description of what you saw.
Troubleshooting
- Nothing happens when I click Check. You need a text layer or text component selected before running a check. With nothing selected, the sidebar shows a Selection Required error: “No text component is selected. Please select the text layer you want to check and try again.” Select a text layer and press Check again.
- My browser didn’t open when I clicked Sign In. A popup blocker likely intercepted the auth window. The sidebar shows a “Sign-in window didn’t open?” fallback with a Copy sign-in link button — click it, then paste the link into a new browser tab to finish signing in.
- A check is taking too long. While the scan runs, click Cancel to stop it, then re-run against a smaller selection.
FAQ
- Where do I configure the Style Guide? From the agents home after sign-in, or the Settings panel (gear icon) between checks. Settings persist for your session.
- Can I check my whole Figma page or file at once? No — checks run against the text layer(s) you select. Select the layers you want to audit before clicking Check.
- Does Markup AI understand the context of the text it checks? Yes — the extracted content preserves the structure of your Figma layers, so checks consider how the text is organized rather than treating it as a flat blob.
- Can I change my settings after the first check? Yes — click the Settings gear at the top of the sidebar to reopen the agent toggles and Style Guide dropdown. Changes apply the next time you press Check.
- Can I undo a suggestion I just applied? Use Figma’s Undo (Ctrl+Z / ⌘+Z) right after applying to revert the text change on the layer.
Known limitations
- No whole-document check. Markup AI checks the text layer(s) you select, not the entire Figma page or file in one pass — select the layers you want to audit before running Check.
- Non-text elements aren’t analyzed. Markup AI focuses on the text in your layers; images, shapes, and other non-text content are ignored.
- Large selections take longer. For big text-heavy selections, the scan may take a while — cancel and check a smaller selection if needed.