
Markup AI for MadCap Flare — Integration Guide
Markup AI for MadCap Flare — Integration Guide
Use Markup AI inside MadCap Flare to check, score, and rewrite content while you author. The integration runs as a sidebar hosted inside Flare — open a topic, click Markup AI ▸ Sidebar, and review issues from the panel without leaving the editor.
The plugin analyzes the active topic and applies suggestions in place, so you can triage issues and rewrite text right where you’re working.
What you need
- MadCap Flare on Windows — the plugin hosts the Markup AI sidebar and requires Flare to load it. The latest version of Flare is supported.
- The Microsoft Edge WebView2 runtime — the sidebar renders in WebView2. It’s preinstalled on Windows 11 and current Windows 10; if the sidebar opens blank, install it and restart Flare.
- The .NET Framework 4.8 runtime, which ships with current Windows 10/11.
- A Markup AI account — create one at console.markup.ai.
Which agents are supported
- Style Agent
What Markup AI does for you in MadCap Flare
- Check & score: Analyze the active topic and get a Content Risk level (High / Medium / Low Risk) plus a count of issues found.
- Grouped, filterable issues: Issues from the Style Agent are returned as a categorized list. Filter by severity (High, Medium, Low) or by category (Style, Brand, Consistency, Clarity, Tone).
- Jump to issue in the topic: Click an issue card in the sidebar to select the matching text in the Flare editor — useful for locating the issue in long topics.
- Apply a suggestion: When Markup AI returns a suggested replacement, click it in the issue card to rewrite the text directly in the topic.
- Results for each topic: The sidebar keeps separate results for every topic you check, so switching between open topics doesn’t lose your place.
Installing the plugin
Install Markup AI for MadCap Flare with the self‑extracting installer, MarkupAI.MadCapFlarePlugIn-Installer.exe. It lays down the plugin and enables it for you in one command.
Unblock the installer first (Mark of the Web). Windows tags anything downloaded from the internet as “came from another computer,” and it flags a still‑blocked plugin so it never appears in the Plugins list — with no error message. Right‑click the downloaded exe → Properties → tick Unblock → OK before running it. The exe is Authenticode‑signed, which keeps Windows SmartScreen prompts to a minimum.
Unblock and close Flare
Right‑click MarkupAI.MadCapFlarePlugIn-Installer.exe → Properties → tick Unblock → OK. Then close MadCap Flare — the installer refuses to proceed while it’s running.
Run the installer with your Flare.app path
From a command prompt — elevated if Flare lives under Program Files — run the installer, passing the path to your Flare.app folder (the version part of the path depends on your Flare version):
It verifies the folder is a real Flare install, copies the plugin into …\Flare.app\Plugins\MarkupAI.MadCapFlarePlugIn, and enables the plugin for you. Run it with no arguments to be prompted for the path, or --help for options.
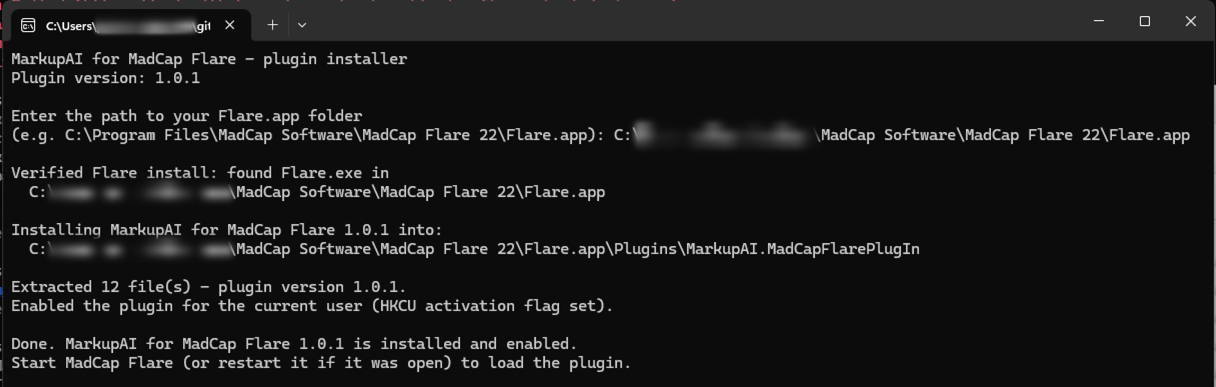
The installer enables the plugin for the user who runs it. If an administrator installs it for a different user, that user enables it once via File ▸ Options ▸ Plugins.
Updating and uninstalling
- To update: close Flare and run the newer installer — it replaces the plugin folder in place. The installer prints the version it’s installing, so you can confirm which build you’re on. Flare remembers the plugin is enabled, so you won’t need to tick it again.
- To uninstall: close Flare and delete the
…\Flare.app\Plugins\MarkupAI.MadCapFlarePlugInfolder — there is no separate uninstaller.
Launching Markup AI in a topic
- Open any topic in Flare.
- Show the sidebar in either of these ways:
- Ribbon mode: click Markup AI ▸ Sidebar on the ribbon.
- Tool Strip mode: click the Markup AI toolbar button.
- Sign in to Markup AI if prompted. Sign‑in opens in your default browser (where you’re usually already signed in); complete it there and return to Flare, and the sidebar switches to the main view automatically. Your session is remembered across Flare restarts.

Login opens in your default browser rather than a popup inside the plugin, so you don’t have to sign in from scratch every time. To force a fresh sign‑in, close Flare and delete the WebView2 profile folder at %LocalAppData%\MarkupAI\Sidebar\Flare\WebView2 (it’s recreated on next launch).
Configure your check
Before your first check, open the Settings panel (gear icon at the top of the sidebar) and pick the right configuration for your team:
- Style Guide: Select your team’s style guide from the dropdown. When you sign in (or switch organizations), the plugin selects your organization’s default target as the active style guide.
- Available agents: The Style agent checks for style‑guide compliance, passive voice, word choice, and consistency.
Settings persist across topics, so you only need to configure them once per session. If you change a setting after running a check, re‑run the check to apply the new configuration.
Running a check
- Open the topic you want to check. Save your work first — checks run against the topic’s current text.
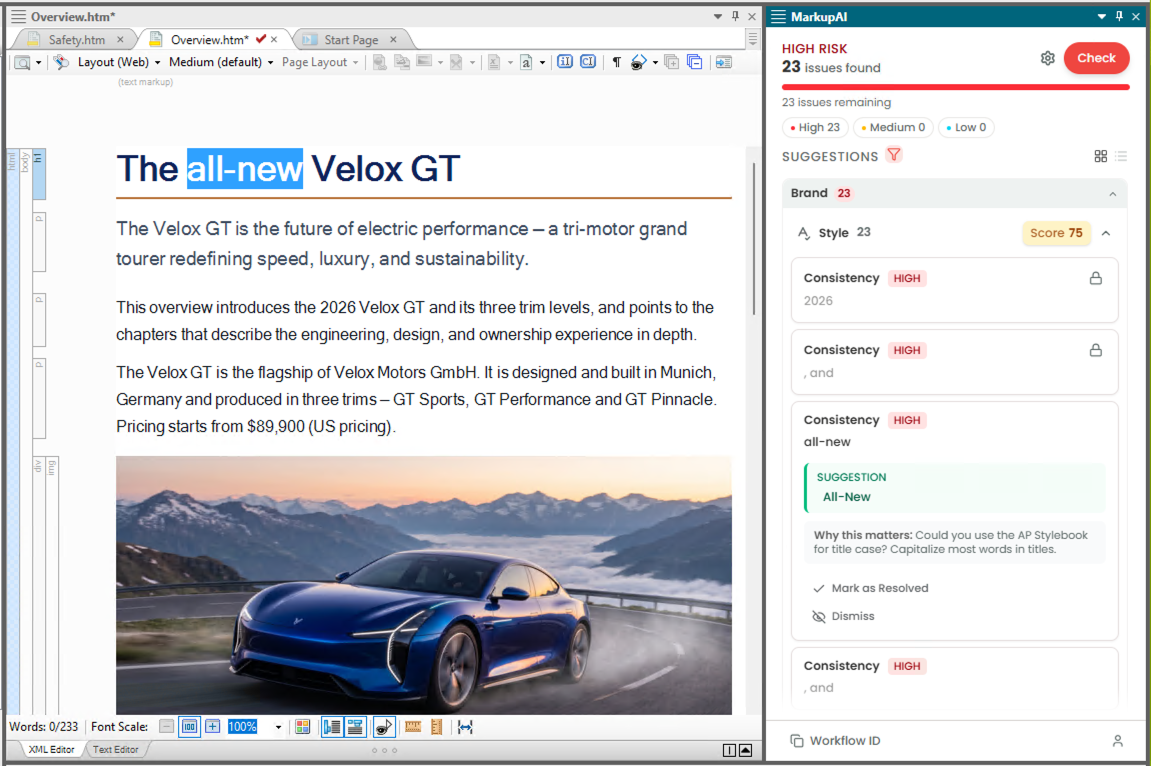
- In the Markup AI sidebar, click Check. The plugin extracts the active topic’s markup, analyzes it, and posts the result back to the sidebar.
- The header updates with:
- A Content Risk banner — High Risk, Medium Risk, or Low Risk.
- An issue count (for example, 48 issues found).
- A severity breakdown — counts of High, Medium, and Low issues.
- A Group / List view toggle.
- Re‑run Check any time you want to refresh the score after editing.
The content is captured at the moment you click Check, so you can keep editing while the check runs without affecting the result.
Reviewing and resolving issues
Once the check completes, Markup AI lists every issue under the Suggestions section. Use the controls at the top of the list to triage:
- Severity pills — Click High, Medium, or Low to scope the list to one severity level. Counts update as you work through issues.
- Group / List — Toggle between Group view (issues grouped by category with counts, like Brand 62, Style 85) and List view (a flat, ordered list).
Working through an issue card
- Click anywhere on an issue card to expand it. The card reveals:
- The category label (Consistency, Clarity, Spelling and grammar, Tone, etc.) and the severity tag (HIGH / MEDIUM / LOW).
- The issue text — the exact phrase Markup AI flagged.
- The suggested replacement (when Markup AI has one) shown under a SUGGESTION label.
- A Why this matters explanation of the rule.
- Click the issue text at the top of the card to select the matching content in the Flare editor — this jumps you to the exact range in the topic.
- Decide what to do for each card:
- Apply the fix — click the suggested replacement (under SUGGESTION) to rewrite the text directly in the topic.
- Edit manually — fix the text in the editor, then click Check again to re‑score.
- Dismiss — remove an issue that doesn’t apply.
The plugin keeps positions accurate even if you’ve edited the topic since the check ran, so selecting and applying suggestions still land on the right text.
Working with multiple topics
The sidebar stays open for your whole Flare session and keeps separate results for each topic you check.
- Switching topics: The sidebar updates as soon as you switch. If you’ve already checked that topic, its results come back right away. If you haven’t, the sidebar shows a “not analyzed yet” message.
- Opening a new topic: The sidebar makes it the active topic automatically — no extra click needed.
- No topic open: The Markup AI button still works. Click it and the sidebar opens with a “no active topic” message.
- Applying a suggestion: A suggestion only ever edits the topic it came from. If you switch topics mid‑click, the change is skipped rather than applied to the wrong topic.
Troubleshooting
-
The plugin doesn’t appear in File ▸ Options ▸ Plugins — almost always the Mark of the Web: the files are still blocked. Unblock the installer exe (right‑click → Properties → Unblock) and run it again.
To unblock the already‑installed files in place instead, run this once in an Administrator PowerShell, then fully restart Flare:
-
The sidebar opens blank — your machine is probably missing the Microsoft Edge WebView2 runtime. Install it from developer.microsoft.com/microsoft-edge/webview2 and restart Flare. The bundle already contains everything else the plugin needs.
-
Sign‑in doesn’t stick, or you want a clean session — close Flare and delete the WebView2 profile folder at
%LocalAppData%\MarkupAI\Sidebar\Flare\WebView2. It’s recreated on the next launch.
FAQ
- Does this work with Flare Online? No — this integration is for the Flare desktop app. For Flare Online, use the Markup AI Chrome extension instead.
- Can I check just a selection? No — checks run against the full active topic.
- How long does the sidebar keep my results? For about 20 topics. Check more than that and the oldest results are dropped — run Check again to bring them back. Switching Flare projects doesn’t reset the count, and all results clear when you close Flare.
- Why did my results disappear after I renamed a topic? Markup AI tracks each topic by its file path, so a renamed topic looks unchecked. Run Check again under the new name.
- Can I move or resize the sidebar? Yes — it’s a standard Flare tool pane. Dock it to any edge, float it, tab it into another pane group, resize it, or auto‑hide it. Flare saves the arrangement with your layout.
Known limitations
- One topic at a time. Checks run against the single active topic — there’s no project‑ or TOC‑level check.
- Referenced content isn’t expanded. Content pulled in by snippets, variables, or cross‑references is not resolved and isn’t covered by a check.
- No inline squiggles. Issues appear as cards in the sidebar. Click a card to select the matching text in the editor — Markup AI doesn’t underline issues in the topic.
- Applied suggestions aren’t recorded as tracked changes. When Track Changes is enabled and you apply a suggestion, the replacement is written directly to the topic and doesn’t appear as a tracked change. This is a limitation of Flare’s replace‑text API, which the plugin uses to edit the topic.