
Markup AI for Oxygen XML in Eclipse — Integration Guide
Use Markup AI inside Oxygen XML Editor and Oxygen XML Author for Eclipse to check and score your content as you author. The integration adds a Markup AI view to Eclipse — open a document in an Oxygen editor, click Check, and review issues from the sidebar without leaving the workbench. Both the Author (visual) and Text (raw XML) editing pages are supported.
What you need
- Eclipse with the Oxygen XML Editor or Oxygen XML Author plugin for Eclipse installed — the two most recent Oxygen versions are supported. Don’t have it yet? See Install Oxygen XML for Eclipse.
- A Markup AI account - create one at console.markup.ai.
Which agents are supported
- Style Agent
What Markup AI does for you in Eclipse
- Check & score: Analyze the active document and get a Content Risk level (High / Medium / Low Risk) plus a count of issues found.
- Grouped issues: Issues from the Style Agent are returned as a categorized list so you can focus on the highest-impact ones first.
- Severity filters: Filter by High, Med, or Low severity to triage the issues that matter most.
- In-editor highlighting: Issues are highlighted directly in the document; click a highlight to jump to the matching issue card — supported in both Author and Text pages.
- Inline annotations: Issues are highlighted inline using annotations directly in the document, and you can take action to apply suggestions right from the annotation.
- Apply a suggestion: When Markup AI returns a suggested replacement, click Apply in the issue card — or Accept from the menu beside the highlight — to write it directly into the document.
- Workflow ID: Copy the workflow ID from the sidebar footer to share a specific check run with Markup AI support.
Installing the Markup AI plugin
Markup AI runs inside Oxygen’s editors in Eclipse, so setting it up takes three steps: make sure Oxygen is installed, install the Markup AI plugin from its update site, and switch to the Oxygen XML perspective.
Install Oxygen XML for Eclipse
Skip this step if Oxygen XML Editor or Oxygen XML Author is already installed in your Eclipse — for example, if Oxygen XML is listed under Window → Perspective → Open Perspective → Other…
-
In Eclipse, open Help → Install New Software… and click Add…
-
Enter the Oxygen update site for your edition in Location, then click Add:
-
Select the Oxygen plugin, click Next, and complete the wizard.
-
Restart Eclipse when prompted.
-
After the restart, enter your Oxygen license key when asked. If Oxygen is already installed as a standalone application on the same machine, its license is picked up automatically.
For supported Eclipse and Java versions, other ways to install, and licensing, see Oxygen’s own guide: Installing Oxygen XML Editor as an Eclipse plugin.
Install the Markup AI plugin
The plugin is distributed through a Markup AI update site. You install it once through Eclipse’s software installer, and Eclipse can then offer updates the same way it does for the rest of your plugins.
-
In Eclipse, open Help → Install New Software…
-
In the Work with field, enter the update site URL and press Enter:
-
Under the Markup AI category, select Markup AI Sidebar for Oxygen.
-
Clear Contact all update sites during install to find required software (see the warning below), then click Next.
-
Review the items to install, click Next, accept the license agreement, and click Finish.
-
If Eclipse asks whether to trust the plugin’s signer, confirm Markup AI and click Trust Selected.
-
Restart Eclipse when prompted.
To update later, open Help → Check for Updates — you don’t need to re-enter the update site URL.
Switch to the Oxygen XML perspective
Markup AI checks the document open in an Oxygen editor. In the Oxygen XML perspective, XML documents open in Oxygen’s editors and Oxygen’s toolbars and views are laid out for you — so switch to it before you run a check:
- Open Window → Perspective → Open Perspective → Other…
- Select Oxygen XML and click Open.
You can also switch with the perspective buttons at the top-right of the Eclipse window once Oxygen XML has been opened there. Eclipse remembers views per perspective, so open the Markup AI view in the Oxygen XML perspective once and it stays there.
Launching Markup AI in Eclipse
Open the Markup AI sidebar in any of these ways:
- Menu bar: Window → Markup AI Sidebar
- Toolbar: click the Markup AI button (tooltip: Show Markup AI Sidebar)
- Views: Window → Show View → Other…, then Markup AI → Markup AI
The sidebar opens as an Eclipse view. You can drag it to any side of the workbench, stack it with other views, detach it, or resize it like any other view, and Eclipse remembers where you put it.
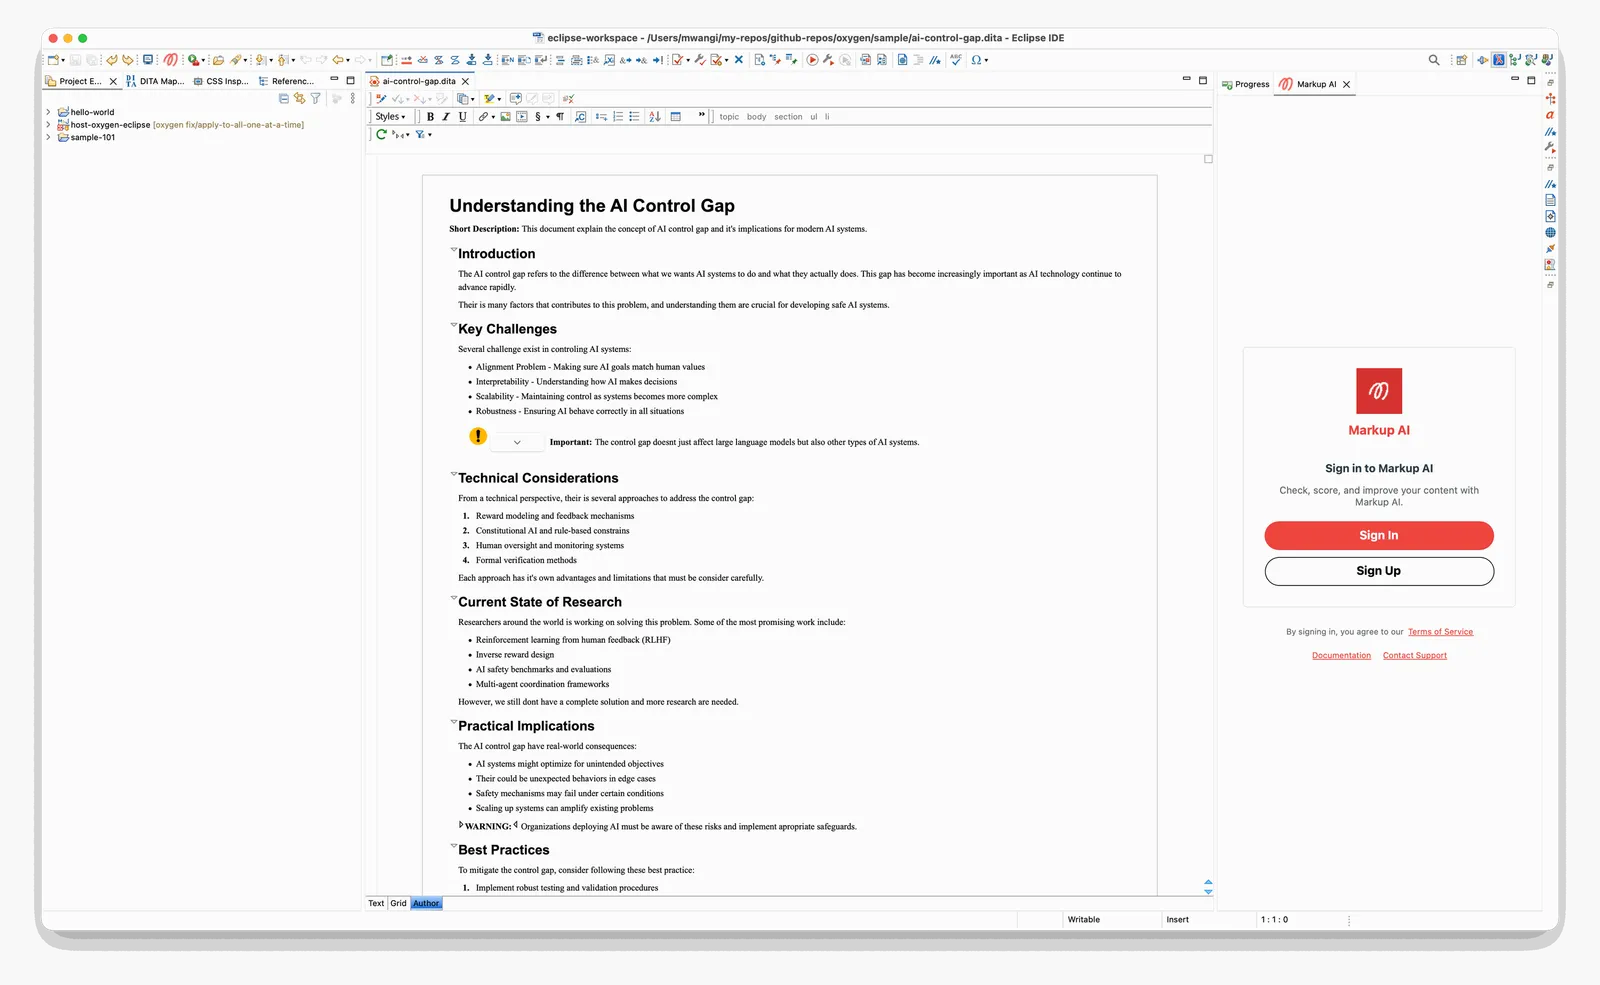
The first time you open the sidebar you’ll see a Sign In screen. Click Sign In — your default browser opens to the Markup AI sign-in page. Complete the sign-in there, then return to Eclipse; the sidebar detects that you’ve authenticated and switches to the main view automatically. If the browser doesn’t open on its own, click Copy sign in url under the Sign In button and paste the address into your browser manually.
If sign-in doesn’t complete — for example, you close the browser before finishing — the sidebar shows the reason in a banner at the top. Click Sign In again to start a fresh attempt; a sign-in link from an earlier attempt no longer works.
Your session is remembered, so you normally won’t need to sign in again on the same machine unless you sign out. Manage your session — including switching organizations and signing out — from the profile menu at the bottom of the sidebar.
Configure your check
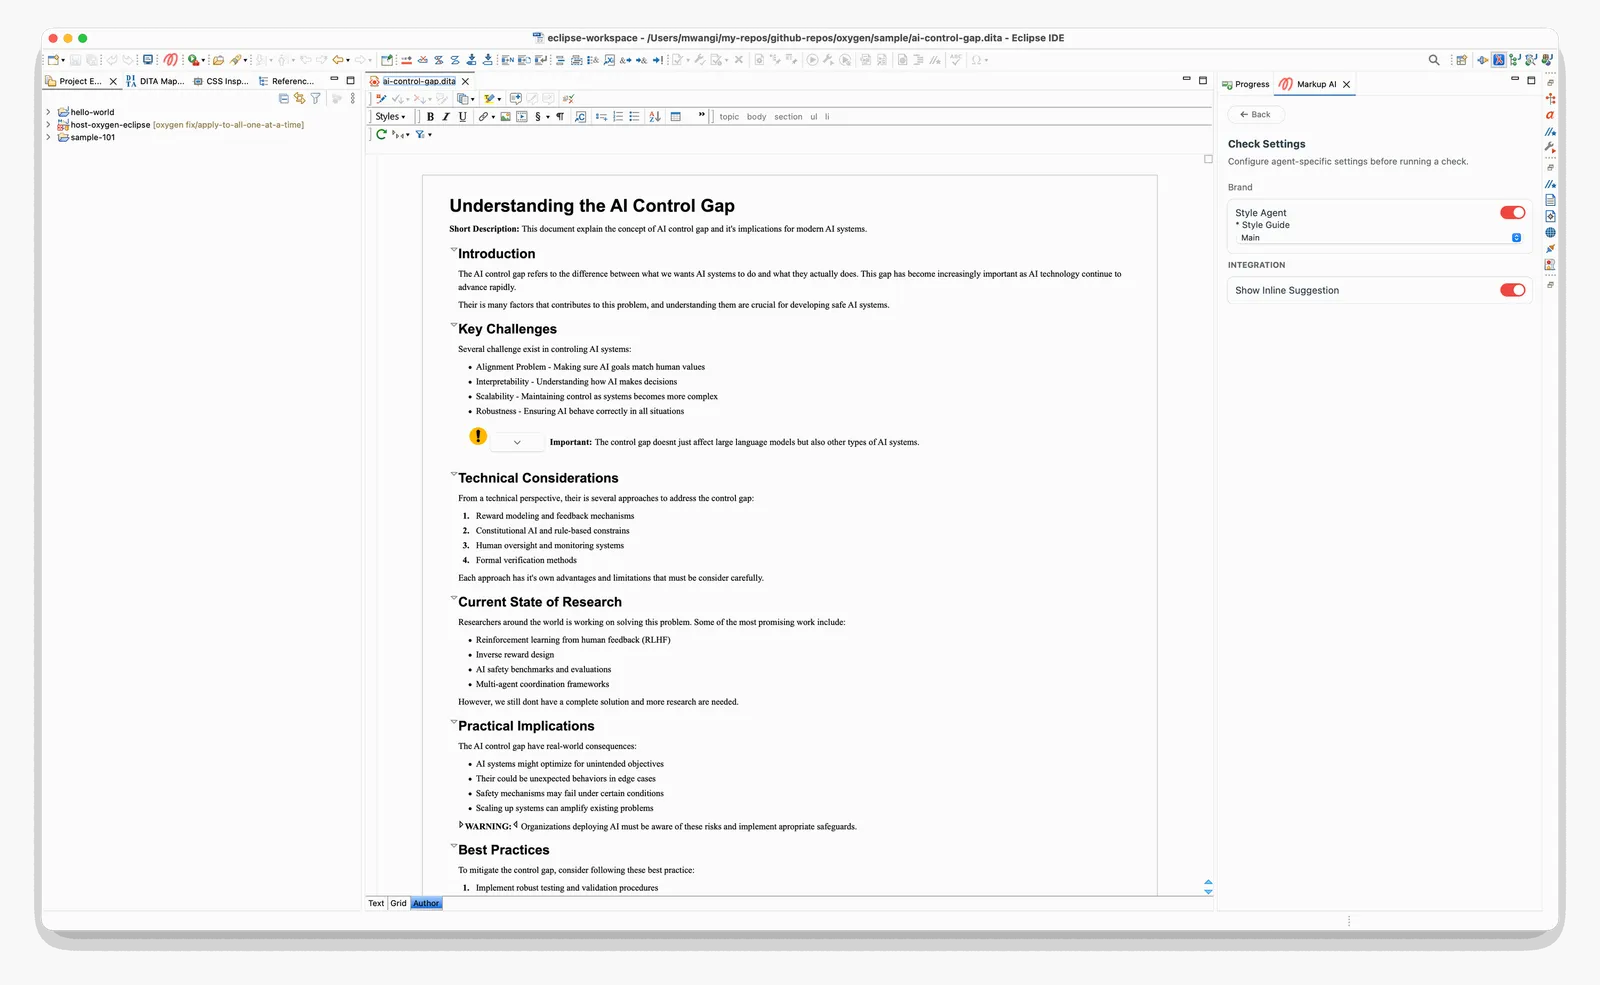
Before you run your first check, open the Settings panel (gear icon, top of the sidebar) and pick the right Style Guide for your team.
- Style Agent: Agents are listed under the category they belong to (for example, Brand). Use the toggle to turn the agent on or off for your checks.
- Style Guide: Select your team’s style guide from the dropdown — it’s required for the Style Agent to run. When you sign in (or switch organizations), the plugin automatically selects your organization’s default target as the active style guide.
- Show Inline Suggestion: Under Integration, turn the in-editor highlights on or off.
If you change a setting after running a check, the sidebar shows a reminder banner — “Settings have changed since your last check — re-run to apply.” Run the check again to apply the new configuration. If a required setting is missing, the plugin won’t start a check and will tell you what to fix first.
Running a check
- In the Oxygen XML perspective, open the document you want to check in an Oxygen editor. The Author page (visual editor) and Text page (raw XML) are both supported.
- In the Markup AI sidebar, click Check. Markup AI analyzes the document and posts the result back to the sidebar.
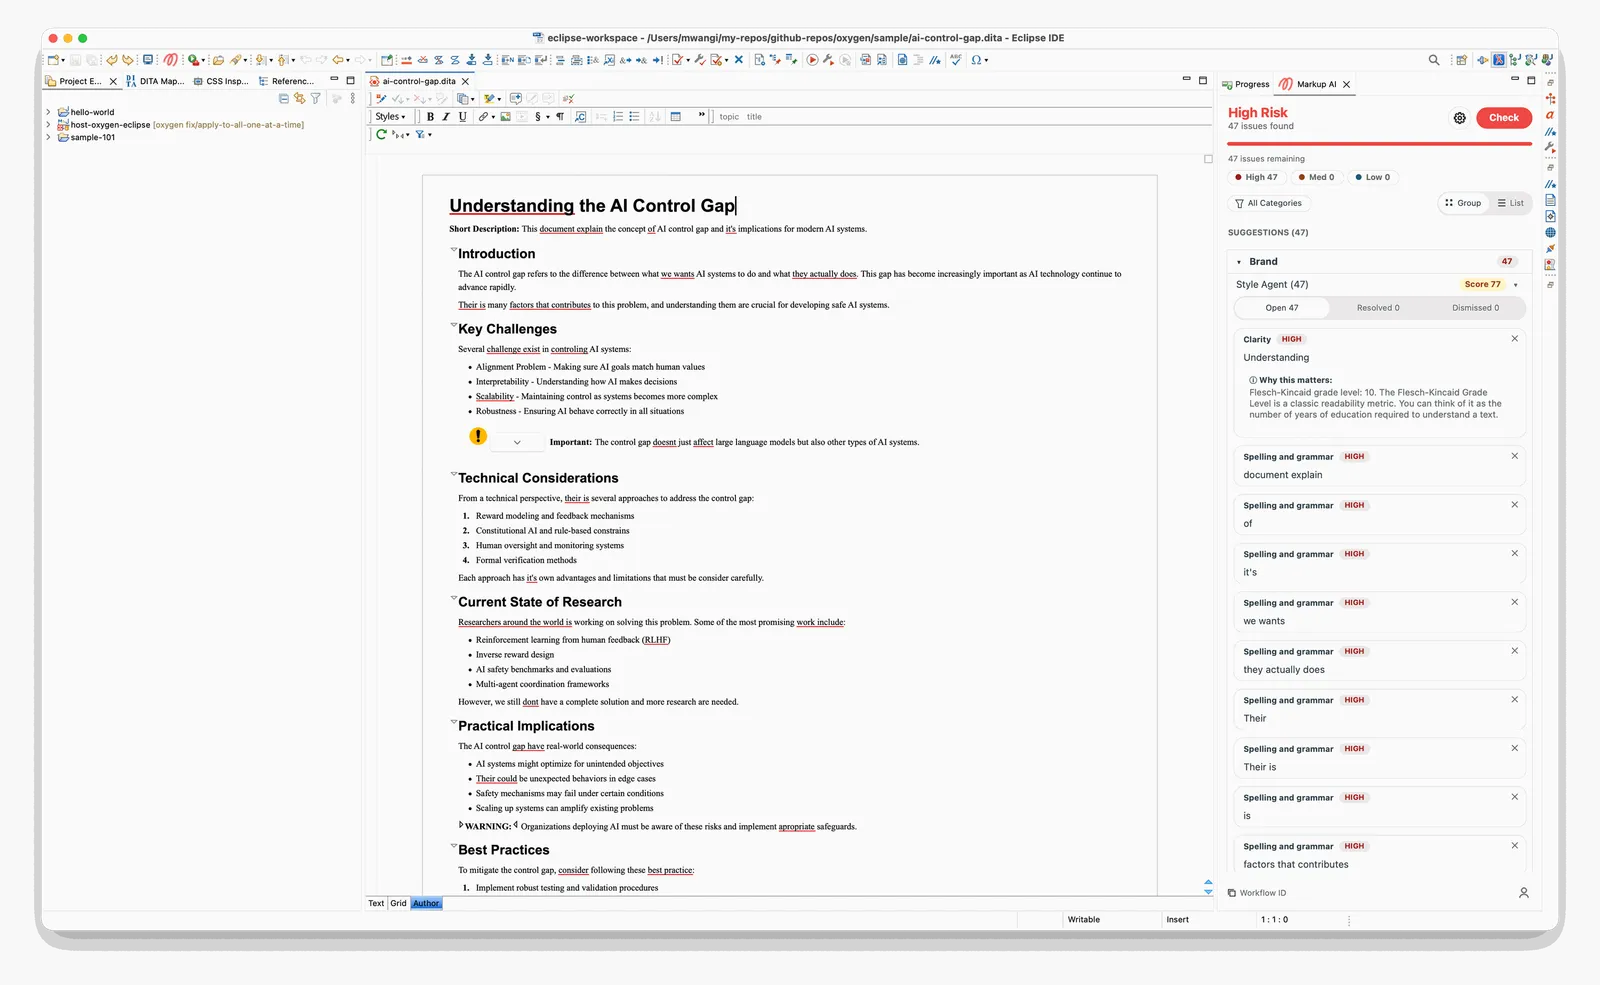
- The header updates with:
- A Content Risk banner — High Risk, Medium Risk, or Low Risk.
- An issue count (for example, 47 issues found).
- A severity breakdown as filter chips: High, Med, Low.
- You can click Cancel at any time to stop a running check, and re-run Check any time you want to refresh the result after editing.
The content is captured at the moment you click Check, so you can keep editing or switch editors while the check runs without affecting the result. Each open document tracks its own check independently.
Reviewing and resolving issues
Once the check completes, Markup AI lists every issue under the Suggestions section. Use the controls at the top of the list to triage:
- Severity chips — Click High, Med, or Low to show or hide issues of that severity. Counts update as you work through them.
- All Categories — Open the filter to scope the list to specific issue categories.
- Group / List — Toggle between Group view (issues grouped by category and agent, with counts and the agent’s score) and List view (a flat, ordered list).
- Open / Resolved / Dismissed — In Group view, switch between the issues still to handle and the ones you’ve already applied or dismissed.
Working through an issue card
Each card shows the category label, the severity tag (HIGH / MED / LOW), and the flagged text. Click a card to expand it and reveal any suggested replacements and a Why this matters explanation of why it was flagged.
From there you can:
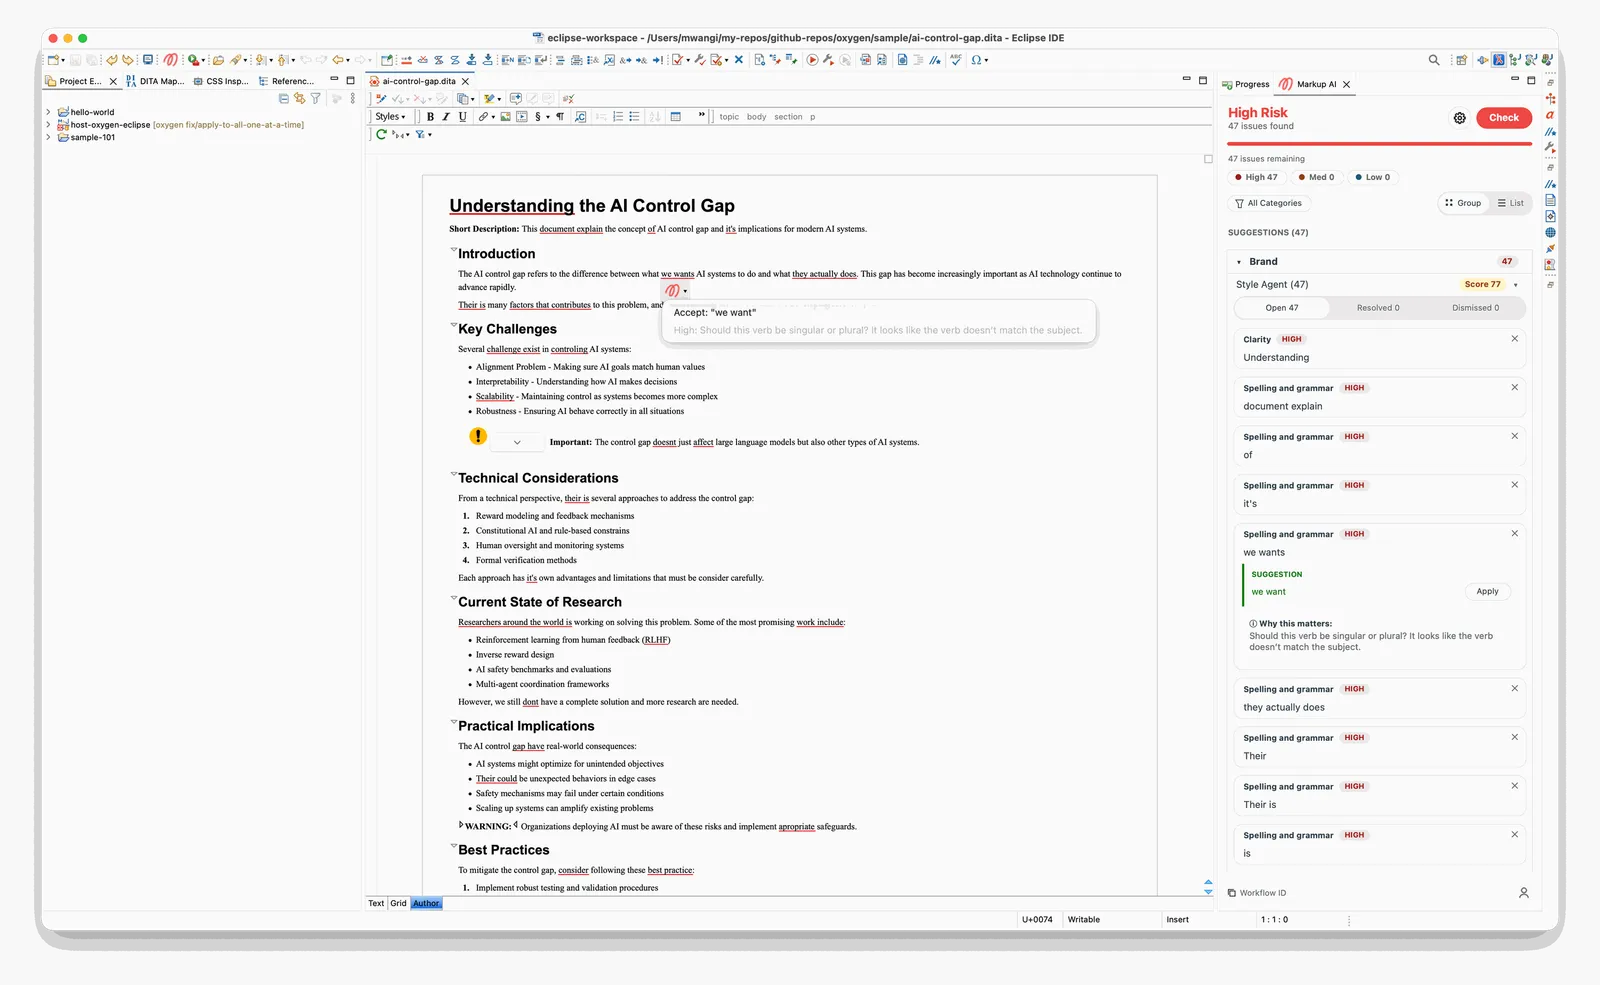
- Apply the fix — click Apply next to a suggestion (under SUGGESTION) to write it straight into the document. Where an issue has several suggestions, click Show more to see the rest. On the Author page, the surrounding XML formatting is preserved.
- Edit manually — rewrite the flagged content in the editor, then click Check again to re-score.
- Dismiss — click the × on a card to hide an issue that doesn’t apply. The sidebar keeps a running count of resolved and dismissed issues, and you can open an issue’s history to see how it was handled.
Findings are underlined directly in the document — on both the Author and Text pages. Clicking a highlight focuses the matching card in the sidebar, and the plugin keeps highlight positions accurate even if you’ve edited the document since the check ran.
You can also fix an issue without leaving the editor: click the Markup AI icon beside a highlighted issue to open its menu, then choose Accept on the replacement you want. The menu also shows the issue’s severity and explanation.
Working with multiple documents
The sidebar always reflects the document you’re currently editing. When you switch editors in Eclipse, the sidebar updates to show that document’s findings and check state — results aren’t shared across documents, so each one keeps its own. After switching, run a fresh Check on the new document to score it.
Troubleshooting
If something doesn’t look right, these tools help you diagnose the issue — or give Markup AI support what they need to investigate.
Share the workflow ID
Every check produces a unique workflow ID. To have Markup AI’s support team review a specific run (for example, to investigate an unexpected suggestion):
- Click the workflow ID in the bottom-left of the sidebar to copy it to your clipboard.
- Share the ID with Markup AI support along with a short description of what you saw.
Get the log file
The plugin writes a log file you can review or send to support:
- Open the profile menu at the bottom of the sidebar and choose About.
- In the Diagnostics card, click Show Log. The plugin reveals the log file (
markupai-oxygen-eclipse.log) in your operating system’s file manager.
The log lives in your system’s temporary folder. If the file manager can’t be opened, the sidebar shows the full path so you can find it manually.
Enable verbose logging
When support asks for more detail, turn on verbose logging to capture DEBUG-level entries:
- Open About from the profile menu.
- In the Diagnostics card, switch Verbose logging on.
- Restart Eclipse — the change takes effect after a restart.
- Reproduce the issue, then collect the log file with Show Log as above.
Eclipse doesn’t start after installing or updating
If Eclipse fails to start right after an install or update, the most likely cause is that Contact all update sites during install to find required software was selected, and Eclipse upgraded some of its own components along with the plugin. Eclipse’s startup log is in the configuration folder of your Eclipse installation. Share it with Markup AI support or your Eclipse administrator, and keep that option cleared when you install again.
FAQ
- Which editors are supported? Oxygen XML Editor and Oxygen XML Author for Eclipse — the two most recent versions. Both the Author and Text editing pages are supported. Documents open in other Eclipse editors aren’t checked.
- Can I turn the in-editor annotations on or off? Yes. Annotations are the highlights Markup AI paints over flagged text in the editor. Use the Show Inline Suggestion toggle in Settings → Integration to turn them on or off — turning it off clears the highlights immediately, and turning it back on restores them for the current check.
- Are the annotations saved with my document? No. Annotations aren’t persistent — they’re an editor overlay tied to the most recent check, not part of the document, and they’re never written to the saved file. They’re regenerated each time you run a new Check, so run a fresh check to see annotations for your latest content.
- How does the plugin handle working with multiple documents? Each open document keeps its own check results, highlights, and dismissed issues — findings don’t carry over between documents. When you switch editors, the sidebar updates to the active document; run a fresh Check on it to score it.
- The Markup AI view says “Markup AI can’t start”. What does it mean? The view shows “Markup AI needs Oxygen XML Editor for Eclipse. Install it, then restart.” when the Oxygen plugin isn’t installed, because Markup AI runs inside Oxygen’s editors. Follow Install Oxygen XML for Eclipse, then restart Eclipse. The Setup guide link under the message opens this page.
- How do I update the plugin? Help → Check for Updates in Eclipse.
- How do I uninstall the plugin? Open Help → About Eclipse IDE (on macOS, Eclipse → About Eclipse IDE), click Installation Details, select Markup AI Sidebar for Oxygen on the Installed Software tab, click Uninstall…, and restart Eclipse.
Known limitations
- Checking a selection is not supported: Checks always run against the full active document — you can’t check just a selection.
- DITA maps are not supported: You can’t run a check against a DITA map.
- Referenced content in DITA topics is not supported: Content pulled in by reference (for example, conrefs or content references) isn’t included in a check.